


Your Mac is essentially a snapshot of your digital life. Years of work, personal data, and finely tuned configs that didn’t happen overnight. One bad sector or one botched update, and it’s gone. No warnings, no undoing.
A solid lineup of backup and cloning solutions is shipped with macOS Tahoe (version 26). From Apple’s native Time Machine to full bootable clones, a wide range of options is covered. Let’s break down what setup actually makes sense for your workflow.
In This Blog Post:
- Best Mac Backup Strategy for macOS Tahoe: The 3-2-1 Backup Philosophy
- Option 1: How to Back Up macOS Tahoe MacBook to Time Machine
- Option 2: How to Back Up macOS Tahoe MacBook Without an External Hard Drive
- Option 3: Carbon Copy Cloners on macOS Tahoe (and more)
- Conclusion
Best Mac Backup Strategy: The 3-2-1 Backup Philosophy
The 3-2-1 rule is the backup strategy that should be adopted by all Mac users.
| Keep at least three copies of your data. |
| Use two different types of storage. |
| Store one copy off-site (or in the cloud). |
A local Time Machine backup is provisioned on an external drive as the first line of defense. A cloud backup service, such as Backblaze or iCloud Drive, is then deployed as a secondary redundancy layer. This dual-layer architecture mitigates virtually every failure scenario.
Option 1: How to Back Up MacBook to Time Machine
Time Machine is the easiest place to start. It’s pre-installed, and the backups are created automatically in the background. You can schedule them to be performed even hourly. Next, travel back in time to recover a file from days or even weeks ago.
Supplies required:
- External hard drive/SSD
- USB or Thunderbolt connections
- The drive should be at least double the capacity of your Mac’s internal storage.
- A large spinning hard drive (if speed isn’t a priority)
- A fast SSD (a nicer experience but costs more)
- A compatible NAS (Network Attached Storage)
Setting up the Time Machine backup (quick method):
- Plug in your external drive.
- macOS will ask for permission; click Allow.
- Accept the Time Machine prompt.
- Click Options, then Set Up.
- Select the APFS format.
Time Machine will automatically back up your Mac. You can schedule it every hour while the drive is connected. Be ready that the first backup takes the longest. Subsequent ones are fast and incremental.
How to set up the Time Machine backup manually:
- Go to the Apple Menu.
- Open System Settings.
- Click General in the sidebar, then Time Machine.
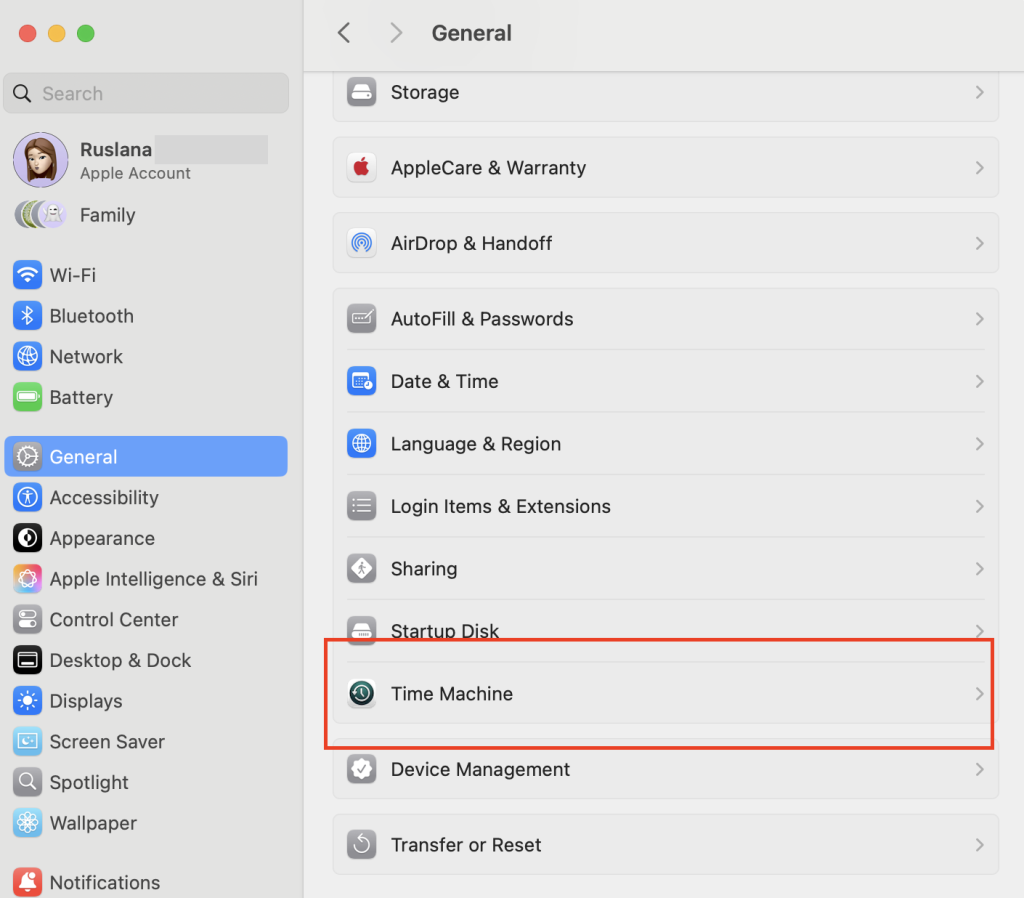
- Click Add Backup Disk….
- Select your external drive from the list and click Set Up Disk.
- Optionally, check Encrypt Backup.
- Set a password to protect your data.
- Click Done.
- Go to System Settings again.
- Choose Time Machine and Back Up Now.
Pro tip: To restore your entire Mac from scratch, macOS Recovery needs to be booted into. On Intel Macs, Command and R are held at startup. On Apple Silicon, the power button is held instead. Once inside, Restore from Time Machine is selected to kick off the process.
Time Capsule and AirPort Disks
macOS Tahoe is the last version to support a Time Capsule or AirPort Extreme-connected disk for Time Machine. It’s applicable only for existing backups. New Time Machine backup stores can no longer be created on these legacy AFP-based devices.
The next major macOS release drops support entirely. Now is the time to migrate. You can use a directly connected external drive or a modern NAS device that speaks SMB.
Key takeaways:
- External drive connected and formatted APFS
- Time Machine configured in System Settings
- First backup completed and verified
- iCloud Drive enabled for active documents
- Cloud backup service (Backblaze or similar) running
- Legacy Time Capsule migration plan in place (if applicable)
Option 2: How to Back Up MacBook Without an External Hard Drive
While iCloud isn’t a full backup solution. Using cloud servers in another solution.
iCloud sync happens automatically. For workflows confined to those locations, your latest files are persistently accessible. All paired devices are covered. Recovery can also be performed directly viaiCloud.com at any point.
To back up via iCloud:
- Go to System Settings.
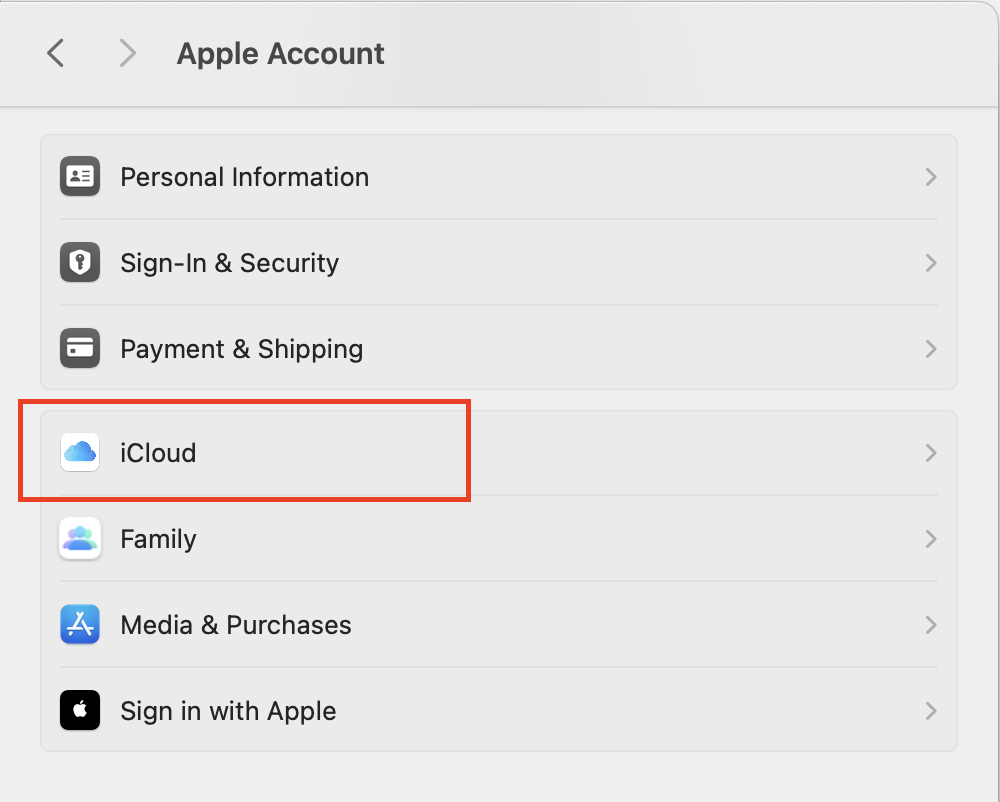
- Proceed to Apple ID.
- Choose iCloud.
- Turn on iCloud Drive.
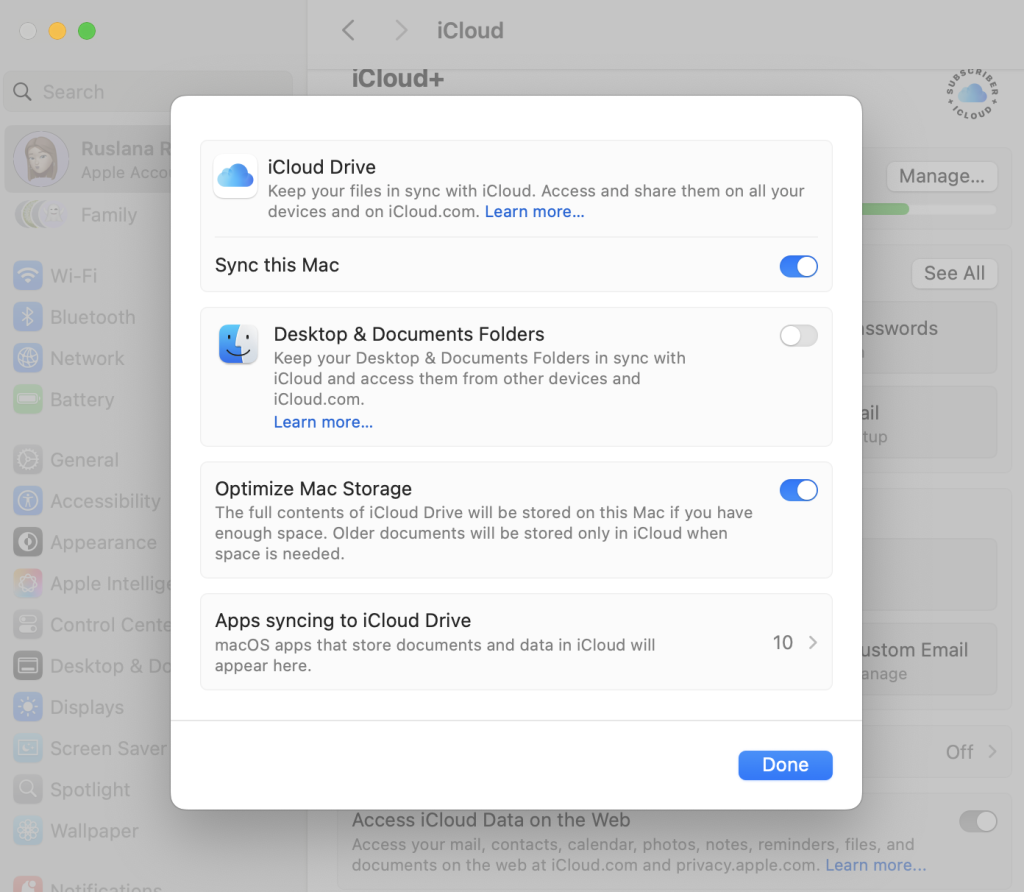
- Check the box for Desktop & Documents Folders.
iCloud is insurance for your active working files, not a replacement for Time Machine.For true off-site backup of your entire Mac, consider a dedicated cloud backup service.
To back up with third-party cloud backup:
- Choose & install a backup service.
- Select data to back up.
- Configure security.
- Set backup type and schedule.
- Run the initial full backup.
- Verify the integrity of files.
- Monitor storage quota and keep the client updated.
Option 3: Carbon Copy Cloners on macOS Tahoe (and more)
A bootable clone is a perfect, exact copy of your Mac’s startup drive on an external disk. Unlike Time Machine, a clone lets you plug in the drive and boot directly from it. As a result, it gets you back to work immediately while you repair or replace your main drive.
Here’s a short description of some bootable cloners’ options and their alternatives:
| Tool | macOS Tahoe | Bootable Clone | Disk Image | Price | Best for |
| Carbon Copy Cloner 7 | YES | YES | YES | $49.99 one-time | Power users, task chaining, full control |
| Stellar Clone Disk | YES | NO | YES | $89.99/yr Pro edition | Rescuing data from a failing drive |
| SuperDuper! | YES | YES | NO | $27.95 one-time | Simplicity, budget-friendly cloning |
| ChronoSync | YES | YES | YES | $49.99 or Setapp $9.99/mo | Time-based backups, sync + clone combo |
The Bottom Line
Backing up your Mac under macOS Tahoe requires almost no effort to set up. Time Machine handles the heavy lifting automatically once it’s running. Layer in iCloud for your active documents and a cloud backup for off-site peace of mind. You’ll have a setup that can survive almost anything.