


Encountering a blue screen on Windows 11 with the message “WHEA_UNCORRECTABLE_ERROR” on an otherwise happy day can take away your smile. The WHEA error (also seen as stop code 0x00000124) stands for Windows Hardware Error Architecture, and Intel says that it means a hardware component (CPU, memory, power supply, disk, etc.) has encountered a fault.

Right here, right now, we’ll break down why this BSOD happens and walk you through some of those practical fixes. Don’t panic. With systematic troubleshooting, you’ll track down those culprits and get your Windows 11 running like Usain. Again!
Possible Causes
Before diving into fixes, here are common triggers for a WHEA Uncorrectable error:
- Hardware failures
- Overclocking/Overheating
- Faulty/Outdated Drivers
- Disk errors
- Firmware/BIOS issues
- Recent changes
In short, anything in the chain from hardware to firmware to drivers can trigger a WHEA stop code. Now let’s fix it step by step.
Methods to Fix the WHEA Uncorrectable Error
Try these methods in order. Each is a common solution to WHEA errors. After each fix, reboot and see if the error persists.
Method 1: Check Hardware Connections
First, rule out simple hardware glitches. Sometimes, a loose or dusty component is the culprit.
- Shut down your PC and unplug it (if it’s a desktop, open the case).
- Carefully remove and re-seat key components: take out each RAM stick, graphics card, and any add-in cards one by one. Clean any dust, then firmly reinsert each into its slot.
- Reconnect all cables (power, SATA, etc.) and ensure everything is snug and secure.
- Close the case and power on the PC.
Reboot and check if the WHEA error still appears. Re-seating hardware ensures no cable or card is poorly connected. It’s amazing how often simply checking whether everything is firmly attached can clear a BSOD glitch.
Method 2: Run Disk Check (CHKDSK)
If you think your drive has hiccups or corrupt files, CHKDSK is your next destination. This one scans errors and fixes them like a champ.
- Open the Start menu, type cmd, then right‑click Command Prompt and select Run as administrator.
- In the elevated window, enter: chkdsk C: /f (Swap out that “C:” if you are one of those who use a different letter for their system drive.)
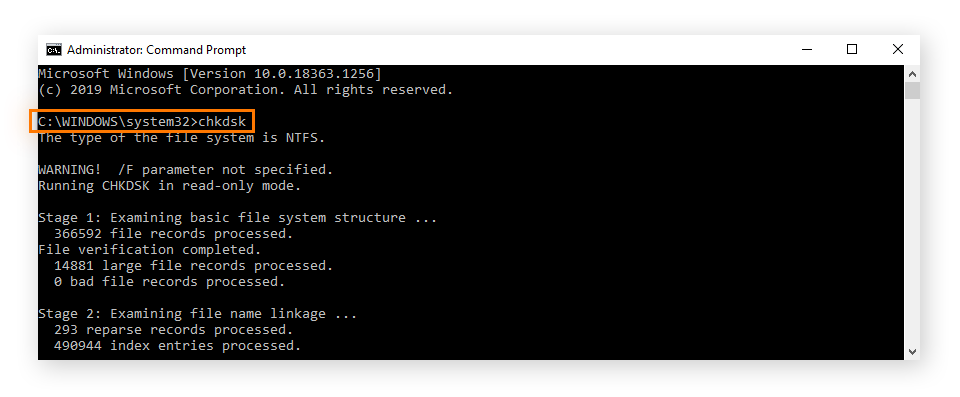
- If you see a message about the drive being in use, type Y to schedule the check at the next reboot.
- Restart your PC and CHKDSK will start right there, automatically when Windows loads.
- When all is done, you’ll see a summary of fixes that it applied.
Once CHKDSK finishes, any disk-related corruption that might trigger the WHEA error will most likely be resolved.
Method 3: Update Windows and Drivers
Outdated system files or drivers are a very common cause of blue screen errors. Make sure Windows 11 is fully up to date and that all device drivers are current.
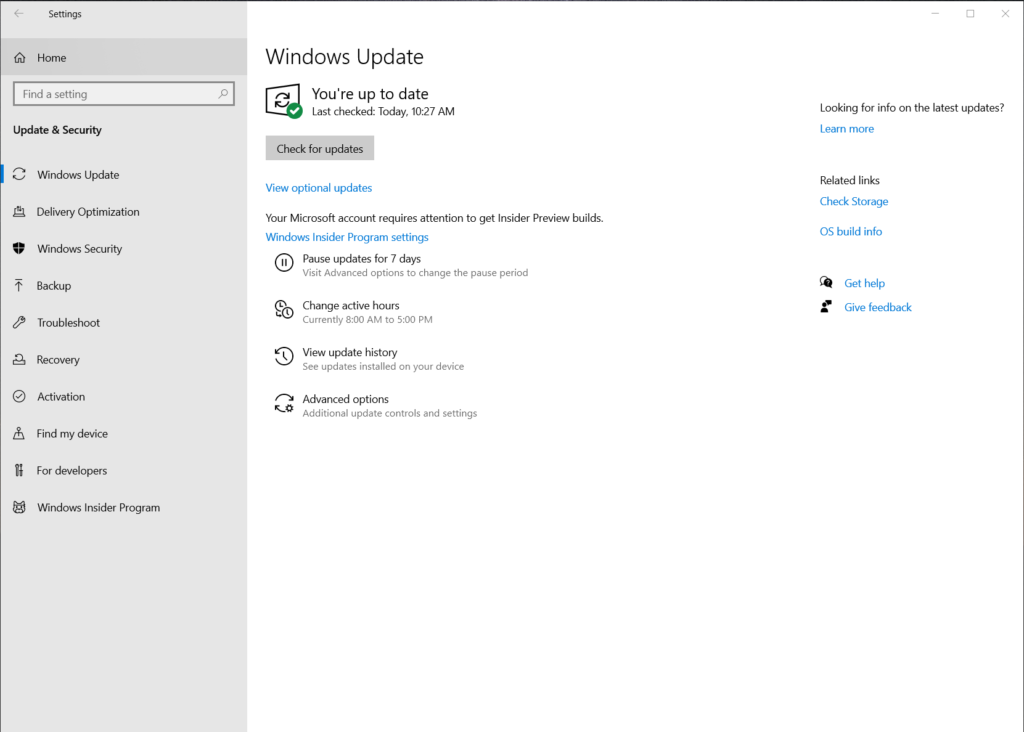
- Go to Settings > Windows Update and click Check for updates. Install any available updates and reboot.
- After reboot, open Device Manager (right-click Start). Look for devices that have a yellow warning sign. For each: right-click the device and choose Update driver > Search automatically.
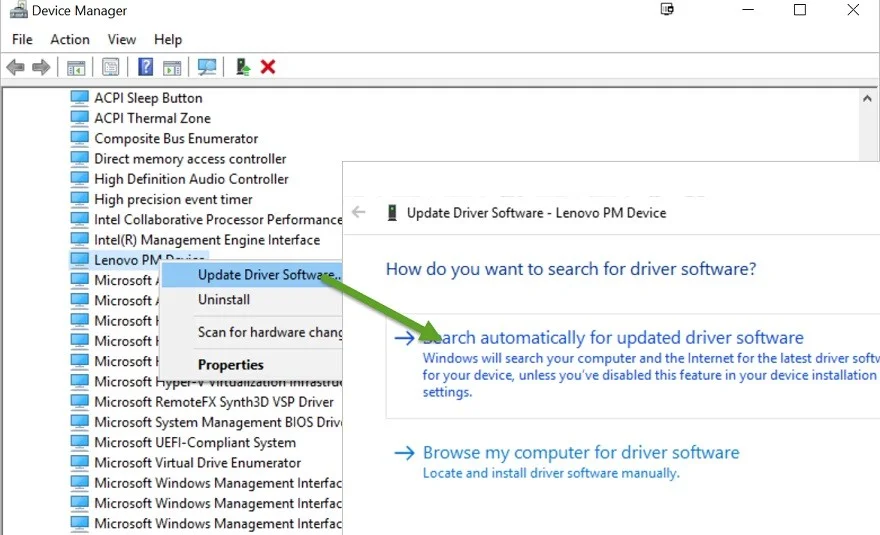
- Pay special attention to Display adapters, Disk drives, Network adapters, and Processors. You can also visit your PC or motherboard manufacturer’s website to download the latest drivers (especially for chipset, graphics, and storage controllers).
- Once drivers are updated, reboot the system again.
Keeping Windows and drivers up to date ensures compatibility with your hardware. As Microsoft advises, Windows Update can automatically deliver recommended drivers.
Method 4: Test Memory (RAM)
Faulty RAM is a classic trigger for WHEA errors. Windows includes a memory diagnostic tool you can use.
- In the Start menu, type Windows Memory Diagnostic and open the app. Choose “Restart now and check for problems”.
- Your PC will restart and start a memory test. Let it complete (it may show progress and any errors found).
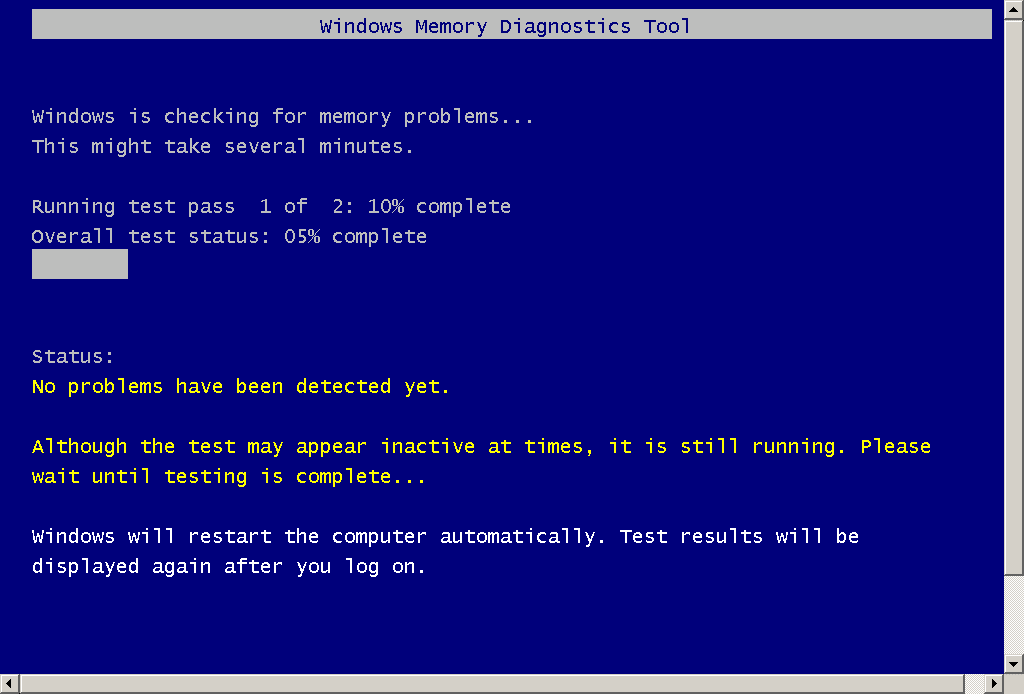
- If errors are detected, the tool will report them when you log back into Windows. Take note of any failures.
- For a thorough check, you can also download and run MemTest86 from a USB stick. Let it do a few passes.
If the memory diagnostic reports errors, remove one RAM module at a time and retest to isolate the bad stick. Replace any faulty RAM. RAM errors are a very common cause of BSODs.
Method 5: Disable Overclocking / Adjust Power Settings
If you have overclocked your CPU/GPU, or are using an aggressive power plan, try resetting to defaults. Unstable overclocking or extreme power-saving settings can cause hardware faults.
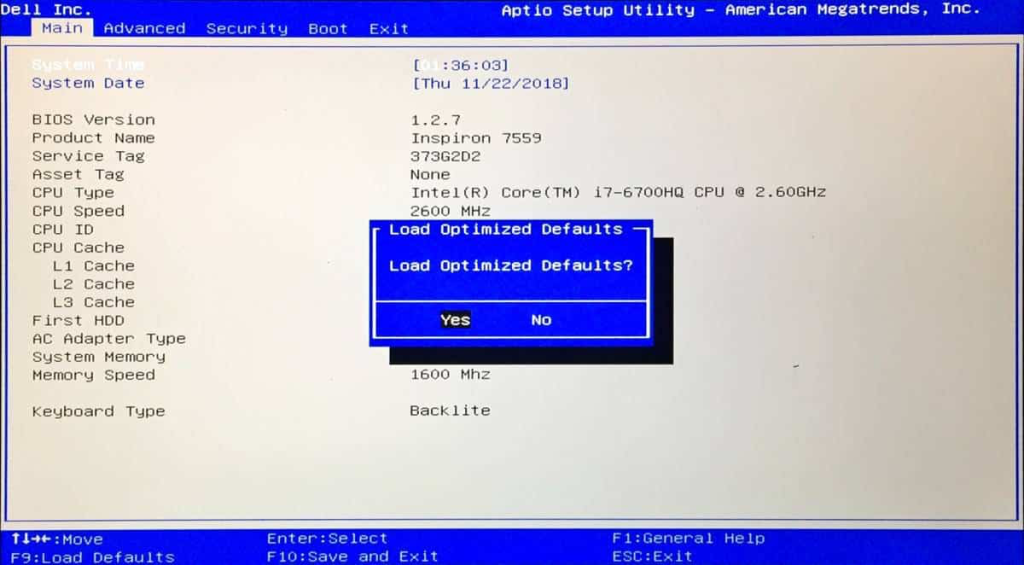
- If you overclocked in the BIOS/UEFI, reboot into BIOS setup and load default settings (often called “Optimized defaults” or similar). Save and exit.
- Back in Windows, open Control Panel > Power Options. Click Change plan settings next to your active plan, then Change advanced power settings.
- Expand Processor power management. Set Minimum processor state to 99% (this effectively disables Intel Turbo Boost). Click Apply.
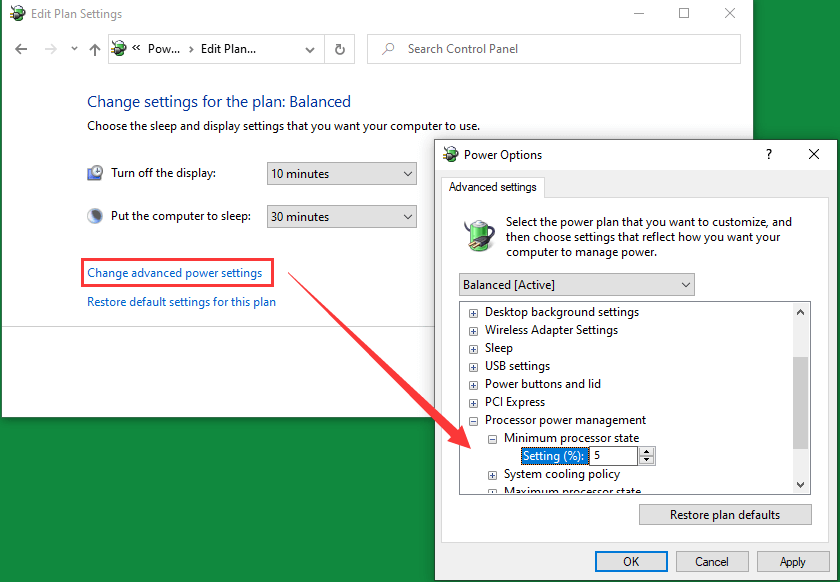
- Also, set the Maximum processor state to 99%, if it’s 100%. Click OK and close the dialog.
Reducing the CPU power range prevents spikes that can destabilize an overclocked system. It’s a quick way to “turn off” overclocking if you can’t enter BIOS.
Method 6: Update BIOS/UEFI Firmware
An outdated or buggy BIOS (motherboard firmware) can cause hardware errors. Check if there’s a newer BIOS/UEFI version for your system.
- Identify your motherboard model (use System Information or look on the board itself). Go to the manufacturer’s support website.
- Download the latest BIOS update for your model. They often provide a Windows-based installer or a file for USB flash.
- If it’s a file, copy it onto an empty USB drive (format it to FAT32 first). Then reboot into your BIOS/UEFI and find the EZ Flash, Q-Flash, or M-Flash utility (name varies by brand).
- Use the BIOS flash tool to update from the file on the USB drive. CAUTION: Do not power off during this process. Once complete, reboot into Windows.
Updating the BIOS can resolve compatibility issues and hidden hardware bugs. Always follow the manufacturer’s instructions carefully. After updating, see if the WHEA error persists.
Method 7: Reset or Reinstall Windows (Last Resort)
When nothing else sticks, a fresh Windows install can sweep away stubborn glitches. Just don’t skip the backup part or you’ll lose something important!
- Before you take such a decision,copy all important files to an external drive or cloud storage.
- Open Recovery settings by going to Settings > System > Recovery, then clicking Reset PC.
- Pick your reset option:
- Keep my files reinstalls Windows but preserves your documents.
- Remove everything gives you a completely clean slate.
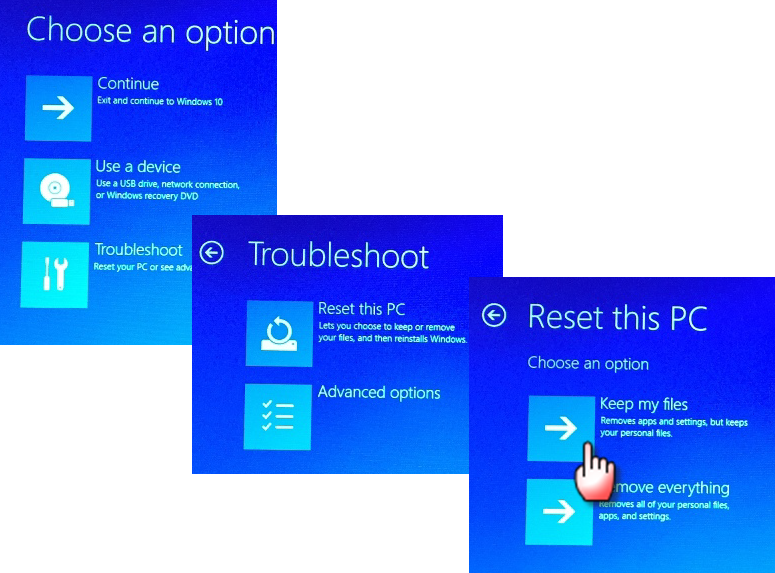
- Follow the on-screen prompts to start the reset process.
A reset will reinstall Windows from scratch and fix all the corrupted system elements or rogue drivers. If WHEA was due to a software conflict, this will usually clear it up. If the error still appears after a reset, it’s almost certainly a hardware defect. Time to call them professionals.
Data Safety Tip: Say you follow one of the methods above, reboot triumphant… and then realize the document you’ve been working on has vanished into thin air. If that happens, consider getting a professional Windows data recovery software. It lets you deep scan your drive for lost documents, photos, videos—even the random “notes” file you forgot about. You can go ahead without any kind of stress and grab a free version to preview whatever is recoverable in there. Then, if you need full‑blast recovery power, think unlimited file restores, support for every file type, and advanced drive‑imaging features, you can go with an upgrade to premium. No complex jargon, no endless menus. Just install, scan, and hunt down missing data so you can get back to work without breaking a sweat.
Conclusion
Congrats there. You’ve officially walked through every major tweak. Checking connections, running disk scans, updating drivers, and resetting BIOS settings, you’ve been there. If the WHEA Uncorrectable Error still crashes your session, you’re likely facing a failing hardware component. In this situation, just know that it’s high time you swap that faulty part out or find your local technician. Don’t forget to keep that Windows 11 of yours updated and your system’s hardware in check to keep those blue screens at bay. Smooth boots ahead!