


The most recent surveys on data loss among users found that over 70% of respondents had experienced accidental erasure of important files at some point. Even though such a deletion is rarely final and users can often bring the files back to their devices, there are cases in which the success of the data recovery process is hindered.
When it comes to Mac users, some of the factors compromising data recovery include the negative effects of SSD wear level and TRIM commands.
What Is the SSD Wear Level on Mac Devices?
All SSDs will inevitably break down when they repeatedly erase and write the same data to cells. When wear leveling becomes too advanced, the SSD will tend to malfunction and, over time, stop working altogether. SSD wear leveling (SSD wear level) occurs when particular SSD cells become independently damaged. It negatively influences their functional capacity for data storage.
You can conduct an SSD health check and performance optimization using wear-leveling technology. It minimizes SSD damage by maximizing the average number of write and erase cycles per memory cell. These technologies distribute writes and erases evenly across a multitude of SSD blocks.
What Does TRIM Do?
The TRIM command (also known as the Advanced Technology Attachment command) is an SSD optimization command that identifies unused SSD blocks eligible for erasure. In a way, the TRIM command works like an advanced cleaner, helping organize your SSD. The practical implication of the process is removing unused data when your Mac starts to misbehave.
What happens when TRIM is disabled on your Mac? The SSD will use any sector to rewrite the information when needed. The rewriting process may take longer, and the SSD lifespan will decrease. This happens because your SSD may constantly rewrite the same cells, which can degrade their integrity faster.
SSD Wear Level and TRIM Command Impact on Data Recovery
Data recovery on Mac can become challenging due to SSD wear and the TRIM command. SSD wear may result in data being scattered around different blocks, which poses difficulties for the data restoration process. The TRIM command, on the other hand, leads to immediate data deletion, making successful file recovery a matter of how quickly a user reacts.
| Factor | Impact on Data Recovery |
| SSD Wear Level | The SSD’s wear leveling leads to data fragmentation and overwrites, complicating file recovery. |
| TRIM Command | The TRIM command precipitates the permanent file removal, making it difficult to restore files that have already been erased. |
| Permanent Data Loss | The time window for data recovery on devices with TRIM enabled is much shorter, so it’s necessary to act quickly after the accidental loss. |
Recovery Strategies for SSD Wear and Active TRIM Command
Despite the above-mentioned limitations connected to the SSD wear level and the enabled TRIM command on Mac, successful data recovery is possible. It’s essential, though, to act quickly and use professional recovery options immediately. Let’s break down the most effective strategies for SSD wear- and TRIM command-related scenarios.
1. Avoid Overwrites
When data loss occurs:
- Stop using the device immediately.
- Don’t restart your Mac
- Avoid uploading or removing any other files or apps
These steps prevent further overwriting of the lost files, which can make future recovery impossible.
2. Disable the TRIM Command
To turn the TRIM command off:
- Use the Spotlight search to open Terminal.

- Put down the command: “sudo trimforce disable”.

- Hit Return to execute the command.
- Enter the admin password if prompted.
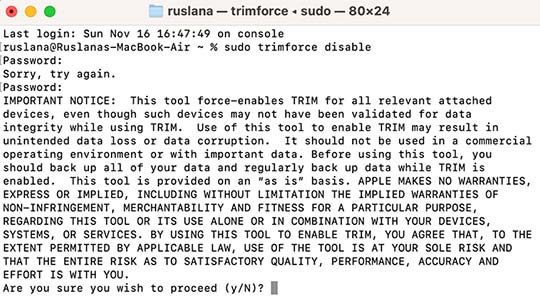
- Enter “Y” to confirm the command.
3. Use Data Recovery Software
Advanced models of data recovery software can bypass the SSD wear and retrieve accidentally deleted files. It’s vital to choose trusted third-party solutions specializing in fragmented file reconstruction and TRIM awareness. The algorithm for running such apps on Mac is more or less standard.
To recover lost files using third-party tools:
- Install a reliable data recovery app.
- Run the scan to identify the files that can be restored.
- Identify and select crucial files.
- Hit Restore or a similar button to bring the files back to the system.
4. Consult Data Recovery Experts
Sometimes recovery attempts are unsuccessful, or users can only restore a small portion of the lost files. If this is the case, consult specialized recovery services. They can use more advanced recovery tools, in combination with hardware interventions, to increase the likelihood of successful file recovery.
Data Loss Prevention Tips
Unfortunately, successful data recovery isn’t always possible. Mac users should consider adopting specific prevention strategies to reduce the risk of permanent data deletion.
- Regular system backups (Time Machine, iCloud, etc.)
- Disabling the TRIM command for sensitive data
- Monitoring the SSD wear level to keep it in an optimal condition
SSD Wear Level, TRIM Command and Data Loss: Practical Considerations
Overall, Mac users benefit from SSD wear level and the TRIM command. They boost a Mac’s performance and prolong the lifespan of its SSD. A potential drawback of these mechanisms is that they can hinder data recovery.
So, it’s crucial to prevent data loss. Make a point of backing up your sensitive data regularly. If the data has been removed, act quickly, disable TRIM, and use professional tools/services to restore sensitive data.