


A hardware plug-in sits near your PC, yet shows a warning “You need to format the disk before you can use it.” Right away, thoughts may turn to whether files are safe, which makes sense. Wiping the storage like this clears everything currently there. Without a fresh copy saved elsewhere, access could come at a cost of missing data.
Here’s the trick: formatting the drive isn’t the sole choice here. You can start with methods to repair a corrupted external hard drive that aim at drive recovery.
When to Repair a Damaged External Hard Drive
Several factors can cause an external drive to be recognized as corrupted. They can be either software or hardware-related. Let’s break down the most common ones.
An external drive may not be recognized properly due to:
- Unsafe ejection of an external drive
- Power outage during the file transfer
- File damage due to malware attacks
- Faulty cables or USB ports
- File system errors
- Bad sectors
Since many “corruption issues” start with verifying if the problem is not a mere drive recognition failure. One way to rule out harm to your drive? Test an alternate cable, or plug it into a separate machine. Another step is to see if the drive shows up in Disk Management.
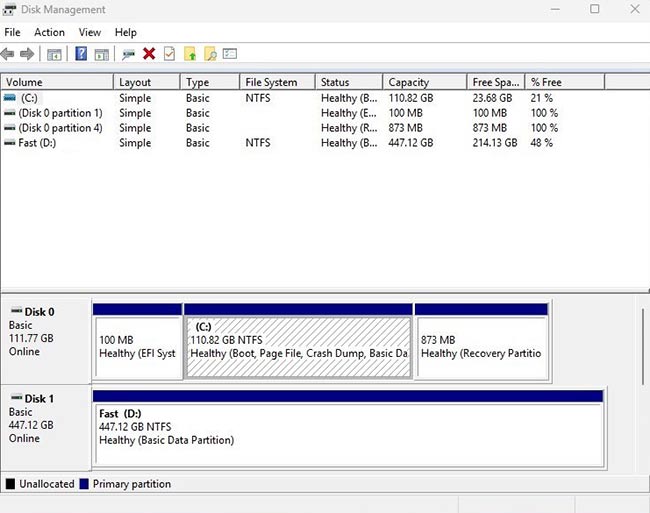
Software solutions are applicable only if Windows detects the external drive.
How to Repair a Corrupted External Hard Drive Without Formatting
1. Use Windows Built-In System Repair Tools
Next up, ways to repair a damaged external hard drive using tools built into Windows will be examined.
Method 1: Use CHKDSK to check Disk Errors
The CHKDSK command is effective when the drive damage is not severe. It will attempt to resolve system errors and recover data from bad sectors (if possible).
- Connect the drive to your Windows PC.
- Run Command Prompt as an administrator.
- Type ‘chkdsk E: /f /r /x’ (E is a drive letter).
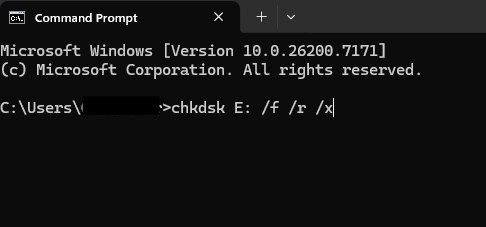
- Execute the command.
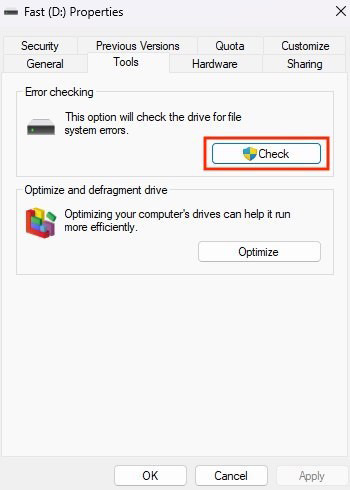
Method 2: Run the Windows Error Checking tool
A different option than CHKDSK exists inside Windows called Windows Error Checking. Running it happens without needing to open a command prompt, making the process simpler.
- Go to This PC.
- Right-click on the corrupted external hard drive.
- From Properties, go to Tools.
- Locate the Error checking section.
- Click on Check.
- Scan and fix drive errors.
- Restart your computer.
Method 3: Repair errors via Disk Management
Disk Management is another built-in tool to check and correct disk errors. It is just as effective as CHKDSK but easier to use thanks to the tool’s graphical interface.
- Select Disk Management from the Start menu.
- Right-click on the external drive.
- Choose Properties.
- Locate the Tools tab.
- Click on Check in Error-checking
- Complete the scan and repair errors.
2. Assign a New Drive Letter
In some cases, simply changing the drive letter can resolve disk recognition issues. It’s quick and safe for data integrity.
- Open Disk Management.
- Right-click the external hard.
- Choose Change Drive Letter and Paths
- Set a new letter.
- Restart your computer.
3. Run Data Recovery Software
One way to ensure data safety is to run data recovery tools to prevent overwriting any files on the external drive.
- Install reliable data recovery software.
- Scan (or deep-scan if possible) the drive.
- Preview the scan results and select recoverable files.
- Restore the needed files to another location.
| When files get lost, Stellar Data Recovery Professional steps in – safely uncovering what’s there. Its power lies in thorough scans along with live previews of contents. Even if a device won’t turn on, this software helps pull data from broken or inaccessible units. That includes outer storage drives connected to your system. DOWNLOAD HERE |
4. Update Disk Drivers
Your external drive won’t function properly if its drivers are outdated. Windows will fail to recognize the drive and access it. You can use Device Manager to update the drivers.
1. Press Win + X to launch the Power Menu.
2. Go to Device Manager.
2. Select the Disk Drive section.
3. Right-click on the external hard drive.
3. Choose Update Driver.
5. Scan for Malware and Viruses
An infected external drive can bring trouble, such as drive corruption. Scanning the computer could help clear out bad stuff. Running Microsoft Defender is one path forward.
1. Press the Windows key.
2. Go to Windows Security.
3. Choose the Virus and Threat Protection option.
3. Click on the Scan Options at the bottom.
4. Start a customized scan of the external drive.
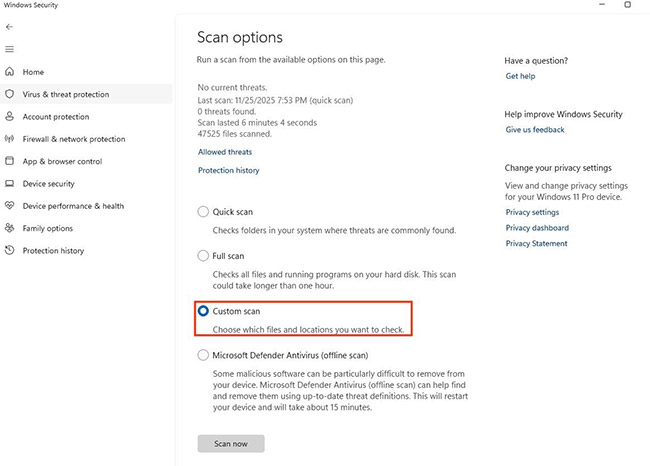
5. Complete the scan and remove potential threats.
External Drive Corruption: Prevention
A few suggestions on preventing external drive corruption:
- Always eject the drive safely.
- Ensure you use quality cables.
- Back up the data from an external drive.
- Avoid overloading the drive.
- Scan your external drive for viruses and malware.
Bottom Line
When your computer won’t see the outside storage and asks to wipe it clean, stay calm. One reason could simply be that the device isn’t being detected. Try gentle fixes at the start – like adjusting settings – instead of jumping straight to erasing data. If recovery fails, only then might formatting become necessary.
FAQs
Filing information back from a broken drive isn’t the same as healing it. Tools do pull data out before things get wiped by accident. After the pieces return safely, cleaning and starting fresh might happen later.
A sign that Windows struggles to access the drive’s structure. Don’t worry – your files remain intact. That is why rushing into a format might not help when better chances exist to recover them.
When Disk Manager fails to show your drive, it might point to a problem with the hardware. Start by inspecting the cable – try swapping ports or devices. Sometimes, plugging into a different machine exposes the real cause.